Tuesday, May 20, 2014

Flower Pot Card

School is over for another year & that means that I can finally get back to my scrapbooking!! :-) There have been so many cards that I have found while scanning Pinterest but I decided that this one had to be the one I scrap-lifted first!


This picture isn't the best however you get the idea! The card was inspired by Nancy Riley's Flower Pot Card which can be found HERE... which then directed me to the Flower Pot Tutorial by Stephanie Luman which is HERE.


The paper is called "Regatta Plaid" from the very old collection by Bo-Bunny called Shabby Princess Collection.


Till next time... Happy Scrapping!! :-)

Saturday, August 24, 2013

Let's get together

After making the last two cards, the scraps were still laying out all over the table in my scrapbook room. I really liked the colour scheme, so what do I do... I thought that I might as well make yet another card of course!!!


You might have noticed that I added a bit of "bling" to the bottom portion of this card!

Even though this card looks so much different than the original cards found here, the paper that I used was the same. It's from "29th Street Market" which is a discontinued collection from "My Mind's Eye".

It just goes to show you how changing the paper around can make a huge difference to the way something looks! :-)


Till next time... Happy Scrapping!! :-)

Think Happy Thoughts

As mentioned in a previous post, Scrapbook & Cards has started making these awesome kits called "Crop & Create Delivered - Creativity at your Door"!

When I receive the kit, there is always a newsletter that contains very detailed instruction on making both cards and layouts. The inspiration for the recent pop up cards that I have been making is this one...


But you know me, I couldn't stop at making just one, so I made this one as well...


The paper used for these card was the "Lost & Found 3 - Ruby" collection from "My Mind's Eye" as well as "Crate Paper's" "On Trend" collection.

Till next time... Happy Scrapping!! :-)

... the magic continues.

The month of August is a busy month for our family... but this year it held a number of milestone celebrations... first my Son turned 20, then my Parents celebrated their 45th wedding anniversary and lastly my Brother and Sister-in-Law celebrated their 20th wedding anniversary! So much to be thankful for!! :-)

It always seems a lot easier to make two cards at once, so when I was making an anniversary card for Mom & Dad, I decided to make one for my Brother and Sister-in-Law at the same time!

As you can see, they are basically mirror images of each other! And as you may have guessed, they are both pop up cards, similar to the ones seen in my last post


These aren't the best pictures, but as they have already been handed out & mailed, these are the only ones I had! (Hopefully the card that was mailed has already been received...! If not, opps - sorry it's last, but it should be there soon!!)

The inspiration for the layout or design of these cards came from Pinterest!

The paper that I used was from "29th Street Market" which is a discontinued collection from "My Mind's Eye".

Till next time... Happy Scrapping!! :-)

Thought of you today... & Smiled!

WoW... where has the summer gone. Only 1 and a half weeks until I'm back at school and I haven't posted nearly as much as I had planned too... so I thought that I should get at least one more post in before the summer is over!

I love buying scrapbook kits... you could say that I'm addicted. Trust me - it's not like I don't have enough scrapbooking supplies, but there is just something about receiving that pizza box in the mail filled with all those new embellishments and paper... oh and all of the new ideas that are in the newsletters that are included!  You gotta love it!!

Well the idea for these cards came from one of those kits! (FYI - if you haven't heard, Scrapbook & Cards has started making these awesome kits called "Crop & Create Delivered - Creativity at your Door"!)

I know, enough chit chat already, just show the card!! Well here it is...!


When it arrives in the mail, it will be flat but once you open it to read the personal message inside, you also see the rest of the message...


This is the way you would display the card... and here is a side view...


Don't you just love it!!

The paper that I used was from Bo Bunny's "Hello Sunshine" line.

If you would like to know how to create one of these cards yourself, just leave me a message & I will send you the instructions! If I have enough people interested, I may just have to write another post!! :-)

Till next time... Happy Scrapping!! :-)


Saturday, April 20, 2013

I'm Back!!

Hello all!

Well school is over for the year! Not sure who is happier to have the next 4 months off... Bruce or Me!! :-)

Although I've been busy with both work & school, I have been able to squeeze in a few small projects, so the next couple of posts will be showing you those!

Even though this cards was the last one I did, I really like the way it turned out... so it's going to be the first one I show you!!


I was inspired by a couple of cards I found on Pintrest!

As you can see, the only paper I used was card stock. I started with a white base, added a black layer - making sure to add the white glittery ribbon before attaching it to the white base! I then added a red layer followed by a white layer.

Using my Cricut, I cut out 5 hearts... 2 black ones were slightly larger than the other 3... I used these as my base for both the "Bride" & "Groom". I then cut out 3 hearts all the same size: 2 white hearts and 1 black one.

One of the smaller white hearts was the Groom's shirt. I then took the same size black heart & made a small cut down the centre of the heart. I slightly turned it out in order to create the lapels of the suit jacket! I then took black ribbon, tied a knot in it and added it as the bow tie! The last thing that I did to the Groom, before attaching the small heart to the larger heart, was to use a black marker & go around it. This was to ensure that none of the shirt was showing through the suit!

The "Bride" was fairly easy to make... just add the smaller white heart to the larger black one. But I found that it was missing something, so in order to make the "Bride" stand out a bit more,  I added a bit of "bling", both with the glitter as well as the gem stones!

In my opinion, these few added touches made the card pop!

Till next time... Happy Scrapping!! :-)


Saturday, June 23, 2012

A New Toy

In one of my previous posts, I mentioned that at the beginning of May I took part in the "Creative Crop" over at the bigpictureclasses.com website in celebration of National Scrapbooking Day. Each hour they would post a new "Challenge"... Challenge 10 was to "Use any cast-off object on your layout".


What does this mean... here is the description they provided: "Your challenge is to use any cast-off object on your layout. It could be product packaging or scrap papers from your studio, mesh fruit bag, bread tags, etc. from your kitchen, outgrown clothing from your closet, stray puzzle pieces…the possibilities are endless! Use your creativity to upcycle such items in your scrapbooking.".


First off let me say that this is not my best layout, in fact I really don't like it at all but I think that we all have layouts that don't turn out the way we intended for them too. 

That being said, let me see if I can remember everything I "re-used" in this layout...

  1. There are 3 silver clips, I guess you would call them, located on the left hand page... these are actually taken from my husbands new dress shirt! Instead of pins, they used these clips!
  2. The paper is all from my scrap box. In fact, if you look really close at the brown triangle edged paper, it had already been cut & I was able to find all the small pieces and tape then together tight enough that you can hardly notice!
  3. Would you believe even the pictures on the right hand side should have been tossed! Only 1 or 2 of those pictures are actually square, the rest are all missing the bottom point, that is why I have overlapped the pictures with the paper!!
  4. Lastly the letters... I know, some of you may be asking yourself "how can the letters be considered "cast-offs" as they are all from the same package"... well I guess I would say because they were left overs... they don't really go along with this page - colour wise I mean, plus I'm not one to use small and capital letters together like that. (However I don't mind the way that part of the layout turned out! I might even try it again!)

Would love to see layouts you create with your cast-off objects!

Till next time... Happy Scrapping!! :-)


Wednesday, May 23, 2012

A future "Golden" Page...

As I haven't really created much over the past couple of months, I seem to now be on a roll... except that I'm creating layouts that I don't have pictures for... YET!  :-)


I don't know about you but I have a whole pizza box full of layouts just like this... layouts just waiting for pictures to be added. Some pages are from classes that I have taken, others are pages I've done, and am just waiting for the right pictures to add. Because of the colouring of this layout, I'm thinking that I will be adding pics of my two Goldens -> Cassie & Wilson. (FYI - On a side note, Cassie turned 3 years old yesterday!!)

As for the paper, I have again used two different companies when creating this layout... "This & That" by Echo Park and "Follow Your Heart" by My Minds Eye.

Notice the triangle strip down the left side of the page... this is actually the part of the sticker page that is to be discarded... it's the bit of sticker that is located between 2 border stickers!! :-)

You'll also notice that I have use 2 different sets of 3 groupings... the triangle affect. First there is the 3 sets of buttons, each containing 3 buttons and secondly there are the 3 arrows creating another triangle!

As for a title, there are 2 places for me to put my title... either across the top of the right hand page or down the side of the left hand page.


Till next time... Happy Scrapping!! :-)


FYI - This layout was inspired by a sketch found in the May 2012 edition of "Kit Ideas & Inspirations" that The Memory Workshop sends out with their monthly kits.


Sunday, May 20, 2012

"so much to be thankful for"

I was sitting here today, getting ready to work on a layout that I had started yesterday but just wasn't getting anywhere with. Then I picked up this paper & the following layout came to mind... 


As I don't have any pictures that really go with this l/o, I am just using my set of "dummy" pictures in the different sizes that I eventually plan to use.

I've used paper from two different companies on this layout... Summer's End by Fancy Pants and Good Day Sunshine by We R Memory Keepers.

Running down the right side of the paper I used the matching rub-ons from Fancy Pants... the rub-on says "so much to be thankful for". I then decided to "stitch" around the whole layout... I thought that this helped the rub-on not to stand out as much.... plus your eye naturally follows the "stitching" around the paper to the words. That's my thinking anyway!

I also decided to use pop dots on the top 4x6 picture, so that I could use the tiny little cloths pins that I have had in my stash for ages! They help to pull out the colours on the page, especially since the brass flowers are so bold.

Till next time.... Happy Scrapping!! :-)

Happy Mother's Day! (2012)

Happy belated Mother's Day to all you Mom's that are reading this! I hope you had a great day!


I've been realizing that a nice card doesn't always have to be that complicated to make... some of the nicest cards are the simple ones... which also means that the don't take long to make! :-) This is one of those cards. It's very simple, yet I really like how it turned out!


This paper is from My Mind's Eye, the "Stella and Rose" collection and I've used my Pumpkin Spice ink pad by VersaMagic Dew Drop to ink both of the papers. You will notice however that the sentiment is a bit darker than the edges of the paper... the reason for this is because I first inked my stamp with a black ink before inking it with my Pumpkin Spice ink! I found that this just helps the words to pop out a bit more & not blend into the paper.


Thanks again for stopping by!!


Till next time... Happy Scrapping!! :-)


Friday, May 18, 2012

Back Again with "Introducing Wilson"

Do you find it hard to be "creative" when you are going through trials... when you are facing some sort of hardship? As much as I have wanted to spend time in my scrapbooking room creating a page or two, I just haven't been able to do it. Instead I sit on the computer and waste time surfing the net or playing mindless games on Facebook! OK there I admit it!! 


Well I finally told myself that enough is enough, life is passing me by & so many things have changed during that time that I need to get my camera back out & start taking pictures again! I can't turn back the clock & capture those moments but I can make sure I don't miss the next ones that come my way!


So on that note, let me show you a layout I made May 5th - National Scrapbooking Day... I had signed up for "Creative Crop" over at the bigpictureclasses.com website in celebration of the day! Every hour for 12 hours they would post a challenge. This was what finally got me to sit here and actually complete a page!!


Their first challenge was to "feature a photo with a fanciful frame".


Don't you just love the Pom-Pom ribbon! I've had it for awhile but I thought why not use it for my "fanciful frame"! Besides, it provides dimension to the page as well as colour! Both the pom-pom & ric-rac ribbons are from My Minds Eye "Fine and Dandy" line.


One thing that I found difficult when using this ribbon was that it kept releasing at the corners. To help secure it, I placed a small gold brad at each of the corners. Next time I think I would try using a glue gun!


I also made the circle embellishment located in the bottom right hand corner! The hardest part I found in making this was getting the glue to dry without loosing it's shape. Next time I will definitely use the glue gun!


The paper that I have used on this layout is from American Crafts "City Park Discovery Park" Collection from last year.

Thanks for stopping by!!

Till next time... Happy Scrapping!! :-)

Thursday, February 23, 2012

el cedral

El Cedral is one of the interesting places we discovered when driving around Cozumel on scooters!


This is another one of my older layouts. I don't remember the line of paper I used but I remember that this layout design was from a class I went to at Scrapbook Parade. It was one of those classes where you use your own product.

One of my favourite parts of this layout is the picture that is on an angle on the right hand side of the layout... instead of using a piece of card stock to mat this picture, we used a page out of an old book! Because of the age & discolouration of the book, it worked really well with this picture... oh & at the top of the page were the words "Sources of Interest", so I made sure that that was showing!

Till next time.... Happy Scrapping!! :-)


Tuesday, February 21, 2012

Oliphant Lake


What an interesting day this was!! :-) We asked Mom & Dad if they wanted to go out in the back country on the quads. We headed up to Oliphant Lake, which just happens to be a man-made lake. At the far end of the lake is this cement wall that was designed to create a waterfall! Whenever we go up to the lake, this is where we stop for a rest, maybe grab a snack & take a walk around the point!

What made this trip so "interesting" is that on the way back, the quad in the front in the above picture ended up going over a rock on the road & the tire popped off the rim!! All I can say is good thing we had both quads!! I was able to drive Dad back to the beginning of the trail, while Bruce slowly drove along the trail as Mom walked beside. Then I went back to pick up Mom & took her back to the beginning of the trail, where Dad was waiting. The house isn't far from the trail so they were able to walk home.  I then went back to where Bruce was & slowly drove the rest of the way home together! :-)

I wish I could remember what line of paper this is, but this is one of my older layouts that I thought I would pull out & post! I can't even remember if I used someones sketch for this or not.

Well till next time... Happy Scrapping!! :-)


Monday, February 20, 2012

Nanoose Bay


It's not until you sit down & write about the layouts that you create & the products that you, that realize you have a tendency to use the same company over & over again! This layout again features Fancy Pants... this time their "rusted sun" collection. The layout was inspired from a sketch I found on the "Sketch Support" website.

As you can see I decided to type out my story on the computer & then print it on patterned paper. I liked doing the journaling this way as I was able to fit more of the story onto the page!

Oh another thing I wanted to mention was the scalloped sticker that runs across the bottom of the striped paper... This is, like I mentioned a sticker... one of those  12" stickers that you find on those sticker pages. When you cut them & line them up against a picture or another piece of paper, it looks like it is a lot longer than the 12"! This is a great way to trick the eye into thinking it is longer!

Thanks again for stopping by!!

Till next time... Happy Scrapping!! :-)


Sunday, February 19, 2012

whale of a time

Welcome back!!

Todays layout features the "Beach Bum" collection by Fancy Pants!


You will notice a couple of things...

  1. I used some "bling" on this layout!! Normally I use the crystals/gems that I can just put where ever I like - no pattern or shape but these swirls reminded me of waves! So this was the 1st time I tried using ones where the crystals are in a particular shape & let me tell you, I needed patients! But once I got the hang of it, it wasn't that bad. 
  2. I used cardstock as part of my background instead of just patterned paper. Because of the dull light brown/tan background (the colour of sand) & the faded patterned paper, I decided on brightening up the page by using orange cardstock. I was able to get away with using this colour because there are bits of orange through out the design on the patterned paper.
  3. I also traced the letters of my title. I have done this a couple of times, especially when part of the title seems to blend into the rest of the page.
  4. I've also used blue rick rack ribbon, that runs across the bottom of both pages, to simulate the waves of the water!
Hopefully it wasn't just the pictures that made you feel like this was a water themed layout!! What will you do on your next layout to add that ever so subtle message about your page??

Till next time... Happy Scrapping!! :-)


Saturday, February 18, 2012

you & me time

A couple weeks ago, my daughter sent me the following message on FB... "Question...do you have any scrapbook paper that just isn't your style, and you aren't going to use? Or does something like that not happen with you?! Lol!"

Well this paper definitely falls under that heading... If I saw this paper on the shelf of my local scrapbook store, there is no way I would have bought it, but it came in a kit I received, so I finally decided to use it. I really didn't care how it turned out, so I also used other product that I normally wouldn't use... such as the cloth flowers & leaves. And you know what... I don't mind the way it turned out!... But I still don't like the colour & I still wouldn't buy it on purpose!! :-)


This line of paper is called "Claire" from S.E.I and as it is an older collection, I was not able to find a direct link to this complete collection to share with you.

So as I have already mentioned, I used product that I wouldn't normally use, such as the cloth flowers & leaves but I also used the clear journaling square. With all the colour that was on this page, I knew it was going to be difficult to add a journalling square that would complement the page... so I pulled out my stack of journalling square & found this one!

You will also notice that I had to cut 2 of my pictures as they cross over the centre of the page. Again, this isn't something I normally do, but because of the pictures I had chosen, it worked out well & doesn't take anything away from the pictures!

So the next time you come across some of that old paper in you stash that you just don't really care for, why don't you pull it out & try making a layout with it... don't worry about how it turns out, even try a few new techniques & see what you think!! You might be pleasantly surprised at how it turns out!  

Thanks once again for stopping by!

Till next time... Happy Scrapping!! :-)


Monday, January 30, 2012

Oregon Coast Line

As you have probably noticed, I do not scrapbook in any particular order! To me, scrapbooking in date order is boring... I like to re-live past events, and by creating layouts that are not in any particular order lets me "jump" around from one event to another & then back again!!

Even the way I decide on what to scrapbook isn't always the same! Some days I choose the pictures first, then the paper & finally decide on a layout. Other times I have been inspired by a sketch or someone else's layout, then decide on the pictures & paper!

No matter what your "style", as long as you are getting layouts done, you are preserving those memories!!

So with that in mind... For this layout I went back to July 2008!


I found the layout on the Sketch Support by Scrapbook Generation Publishing website. If you haven't had a change to check out these website, you need to!! They have sketches of 1 & 2 page layouts, cards & something they call Add-On Sketches. The one things I like about this website is that they list their layouts by the number of pictures on that layout! So if you have 5 pictures of one even, instead of looking though all the sketches, you just look at the sketches that have 5  photos! If you have 10 pics... they have 2 layouts for you to choose from!! :-)

As for the paper, I used the retired "Fresh Print Traveler" collection from My Little Yellow Bicycle.

Thanks again for stopping by!

Till next time... Happy Scrapping!! :-)

Sunday, January 29, 2012

Driving around Cozumel

December 2008, for our 3rd anniversary, we went on our 2nd cruise to the Western Caribbean! What a great time we had! Out of all the places we stopped, Cozumel was my absolute favourite!! We rented scooters & drove around the whole island... stopping at whatever interested us! Because of this, I'm sure that we saw way more than anyone who took one of the tours offered through the cruise line. What memories we have!! I can't wait to go back!! This layout is a reminder of some of the things we saw...


Isn't this a bright, fun layout!! When's the last time you use bright Yellow cardstock as your backdrop??!!?? It definitely jumps out at you! :-)


This is a great layout to make when you have a number of smaller (scrap) pieces of paper from one collections, or patterned paper that goes well together! Depending on the sizes of you pictures, will depend on the size of paper you will need, so before you start a layout like this, go through your photos & decide which ones you want to use & which ones you can cut down in order to focus on the main part of the picture. Once you have cut your pictures to the sizes that you want, then start cutting your paper. You will notice that I chose to only mat one of the 4x6 picture & had that one go above my border line. This helps it stand out from all the rest!


The paper I used for this layout is from Reminisce... however I could not find this Caribbean collection on their website... must be retired...

Well till next time... Happy Scrapping!! :-)


Saturday, January 28, 2012

Run Jump Play


This is my baby girl... Cassie! Don't you just love the larger picture on the right hand side... What timing!! :-) I just had to use that as my main picture!

She's our 1st Golden Retriever. Her & I have spent many hours walking/hiking. We haven't done nearly as much walking over the past little while as we normally like too, but with all this rain we've been getting, who really wants to go walking in the back country and get all muddy... (That's what Quading if for!!!)

For this layout, I used Crate Paper's Brook Collection & would you believe I started this layout back on June 4th, 2010 when I was at a Scrapbooking Retreat that Scrapbook Parade hosted!! I pretty much had the layout all done, I just needed to do something with some of the pictures!

As you can see from the following pic, I used a bunch of brads to create a circle around a close up picture of Cassie. Because of the scalloped edge, I just didn't like the way it looked, it seemed to blend into the layout instead of popping, so I finally decided to add a circle just a little bit bigger than the picture. This just made the picture stand out a bit more. Also by creating the circle of brads, your eye naturally is drawn to that picture!


I did a similar layout of Cassie when she was younger & that time I used heart brads, with the bottom of the hearts towards the picture! I should pull that layout out sometime & post it for you as well!

I also used pop-dots, to add dimension, on the small squares across the bottom of the page that made up the title.

Once again I thank you for stopping by!

Till next time... Happy Scrapping!! :-)

Friday, January 27, 2012

Wilson


This layout is a very simple one, with lots of "white space"... meaning that not every inch of it has something going on. I usually like to get as much into a layout as possible, but when I went to do this one, I only had the 1 picture of Wilson that was taken this day... so what do I do?

When looking through magazines or checking out different websites/blogs, I see quite a few layouts with only one pic, so this was my first attempt...

I'm going to share a little secret with you.... I like to save money... who doesn't these days! But did you know you could do it & still scrapbook!!??!! Honest!

One of the ways I have found to save $$ when scrapbooking is that when I plan on covering most of the cardstock with patterned paper, I cut out the centre of the page! That's right, the cardstock edge on this layout is only 2 inches wide! There is a big 8 inch square cut out of the back!! This is what I used to mat the picture on this layout as well as the larger pic on the last layout - Is it Bath Time?!! (FYI, I did the same thing on that layout as well!!)

Give it a try some time!! :-) And for those of you that are wondering... Yes, I have done this with double page layouts as well!!! :-) Let me know if you try it & how it worked out for you!!

Thanks once again for stopping by!!

Till next time... Happy Scrapping!! :-)

FYI - I completed this layout in under 2 hours... meaning that I beat my record, for creating a 1 page layout, by an hour!! Oh & the paper I used for this layout is also from the "Happy Together" collection by Fancy Pants!

Thursday, January 26, 2012

Is it Bath Time?

This is the newest addition to our Family! He's name is Wilson & he LOVES water!! I call him our water dog! Anytime he can play in water, he does. We learnt this very quickly... I use to fill their water dish almost to the top. All I can say is that it's a good thing we have the water dish in the laundry room, on the linoleum floor... Whenever he goes for a drink, he has to put both front paws in the dish. Then when he's done, he walks forward so that his back paws go through the dish as well. Of course this leave a trail of water all over the house! There are even times when he decides to DIG through the bottom of the water dish. This causes water to get all over the place... even up the wall!

The night before these pictures were taken, Wilson got rather dirty outside, so when we brought him in, I took him straight to the tub for a bath. The next day he came inside & went straight to the tub, trying to get in!! I guess he figured it was Bath Time!! :-)


I had fun doing this page... it just all came together & within 3 hours it was complete!! For me that is a record!! One page layouts don't normally come very easy for me... guess that's why I don't seem to do many of them! :-)

I've been experimenting with new things lately or by trying something new... this layout is no different!

  1. In the centre of this page you see the striped patterned paper with the brown strip... well when I scalloped the edge of the striped piece, it left me with a very thin strip of paper which I put right up against the brown edge... this give it the impression that the brown piece is on top of the striped patterned paper.
  2. You will also notice the triangles going across the brown stip... this was also something new. Those are actually rub-ons & are actually suppose to be joined the other way, creating a larger, thicker triangle strip. It was just too thick & not long enough to use in this narrow space... so first I marked the paper with a very thin line so I would know where to place the triangles, so that they would all be in a straight line. Then I cut the triangles into smaller pieces & lined them up along the line. I really like the way this turned out. It filled in the brown strip so that it isn't so bold!
  3. The strip paper was blending into the other paper & I wanted the edging to stand out more. As I had already attached the paper to the layout, I wasn't able to ink the edge... so I took one of my copper pen & went along the edges!
  4. Lastly, I used pop dots on the 2 smaller outside pictures that are on the bottom half of this layout!

Oh I almost forgot... The paper I used for this layout is from the "Happy Together" collection by Fancy Pants! (If you click on the Happy Together link above, you can scroll down & see the triangle rub-ons that I used!)

Thanks a lot for stopping by!

Till next time... Happy Scrapping!! :-)

Friday, January 20, 2012

Goofy Hats - Simple Stories Blog Hop


Hi Folks & Welcome!!

There is lots of information to cover in this post but trust me it will be well worth the read, so let's get started!! :-)

Last June / July I was introduced to the company "Simple Stories and fell in love with their line of product. Well at the beginning of January, they announced (on their Facebook page) that they were going to have a Fan Blog Hop! I was lucky enough to be one of the first 7 people to respond! All we needed to do was create a layout using their line of product (which isn't that difficult), and they would get the word out!! Oh and to top it off, they are giving away PRIZES!!! How cool it that! :-)

This is how it works - you have 2 chances to win. The Blog that has the most comments at the end of the day wins a Prize  PLUS one of the people that commented on that blog will also win a prize! A second prize will be given to someone who has left a comment on the Simple Stories blog.

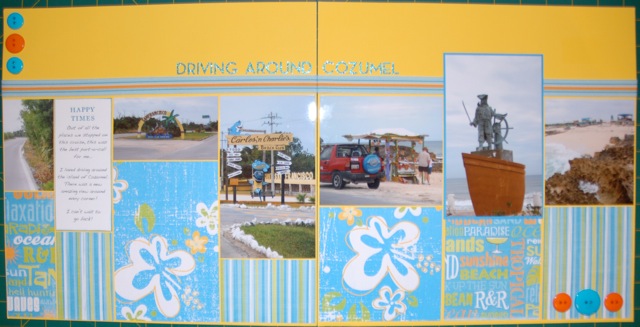
Now that you know how it works, let's take a look at my layout!  I used their "25 Days of Christmas" collection.


I often find myself not using all those little letters that you find on the sticker page, well as you can see, I finally decided to use them. I wasn't able to say everything that I had wanted to say on the journaling card, so I thought I would make it apart of my "Title"!!


Whenever these guys get together, they don't need Goofy Hats to get them going... no, all I need to do is bring out the camera!!


I tried a couple new things with this layout... all of which can be seen in the photo below:

  1. I used a product called "Pearl Pen" by Viva. (I used # 401 - Dark Brown) This is a great way to add a bit of dimension to your layout, as you can make the "pearls" what ever size you want! Very cool product that I will be using again soon!
  2. I finally used a transparency!!! I have talked about using them for some time now & found that the transparencies from Simple Stories are AWESOME!! My main concern about using transparencies has always been... how do I keep them in place without the glue/adhesive showing... Well I no longer have to worry about this when using the transparencies from Simple Stories as they just sticks to the photo - no glue or adhesive needed!! I can turn the page upside down & it doesn't move! :-)
  3. I have a tendency to use pop dots when adding embellishments or my journaling squares, but for this layout you will notice that I raised the large group photo on the left hand side page...   


Thanks again for stopping by & don't forget to Hop on over to the last blog --> Liz Qualman!


Till next time... Happy Hopping.... I mean Scrapping!! :-)


PS - Please don't forget to leave a comment below for your chance to WIN some very cool prizes!!  :-)

Just in case you have missed someone's blog, here is the list for you!!


BLOG HOP SCHEDULE:

1.            Simple Stories www.simple-stories.com

2.            Martha Saenz: welcometomarthaworld.blogspot.com

3.            Simple Stories Design Team Member  
               Kim Holmes http://www.theholmescrew.blogspot.com

4.             Amanda Albright: asquared.typepad.com

5.            Cindy Pittman: scrapixie.blogspot.com

6.            Simple Stories Design Team Member
               Emily Pitts http://www.emilypitts.blogspot.com   

7.            Sara O’Shea:  knittingprose.com

8.            Simple Stories Design Team Member  
               Allison Landy http://scrapsrfun.typepad.com

9.            Kate Blue: Kateblue.blogspot.com

10.         Simple Stories Design Team Member
              Wendy Morris http://scrapnspire.blogspot.com

11.          Naomi Armenta: http://snipitytweetwhispers.blogspot.com/

12.          Michelle Brekke: http://wildnkrazie.blogspot.com/

13.          Simple Stories Design Team Member
               Liz Qualman http://lizqualman.blogspot.com


Sunday, January 15, 2012

Gorgeous Sunset

Hey there, just finished this layout and wanted to share it right away!


A couple weeks ago, we made a quick trip up to Parksville to pick up paper for the layout I'm working on for the Simple Stories Fan Day Blog Hop that is taking place this coming Friday, January 20th! Anyway, while I was in the store up there, Scrapbookin' Adventures, I saw a layout that I liked & it looked so simple to do. Once I got in the truck, I quickly sketched it on the back of a receipt so I wouldn't forget it!


We stopped in Nanaimo & my hubby said we could stop at another scrapbook store & I saw this paper... it's BoBunny's "Forever Fall" collection. It's not a colour I ever really buy, but it was just calling out to me. I had no idea what I was going to do with it, but I knew I had to get it.


On the way home, that's when it came to me, use this paper to do the layout I had seen in Parksville. So when I got home I put the layout together, but then what pictures do I use... Well tonight I was looking for some winter pictures & came across these pictures... They were taken this past September when we were camping in Parksville! I took Cassie for a walk as the sun was setting... sure glad I took my camera as well!!


This picture really doesn't do it justice, but this was the only one that wasn't washed out or too dark! As I've said before, I like to take multiple pictures of the same thing - action shots. In these pictures, the setting sun is the only thing that changed! In the large picture you can see the sun just above the hill, yet a couple seconds later, you can no longer see the sun. This picture I cut into small squares across the bottom... a small mosaic pattern!


It's hard to tell, but I also inked all the edges with my gold coloured ink.


Well thanks again for stopping by!


Till next time... Happy Scrapping!! :-)

Wednesday, January 4, 2012

New way to Share your Photos - # 2

Here's the second one...

I didn't look at these pics until after I had already given it, so they aren't the best, but at least you get an idea as to different ways you can decorate them!


There is a bit of a glare on the above pic, so I added this one as well...


The pic I took of the top one, didn't turn out, so I don't have a close up of that one, but here are the middle & bottom ones...


If you decide to make one yourself & have any questions, please post a comment or send me an email! :-)
Hint: I use a glue stick to glue the base paper to the record. When adding your mats, don't use your normal mounting square, instead use a better double sided tape... I use Pioneer Photo Memory Mounting Taper. It looks like this:


Thanks so much for stopping by!

Till next time... Happy Scrapping!! :-)