Showing posts with label ~ Helpful Hints ~. Show all posts

Sunday, May 20, 2012

Happy Mother's Day! (2012)

Happy belated Mother's Day to all you Mom's that are reading this! I hope you had a great day!


I've been realizing that a nice card doesn't always have to be that complicated to make... some of the nicest cards are the simple ones... which also means that the don't take long to make! :-) This is one of those cards. It's very simple, yet I really like how it turned out!


This paper is from My Mind's Eye, the "Stella and Rose" collection and I've used my Pumpkin Spice ink pad by VersaMagic Dew Drop to ink both of the papers. You will notice however that the sentiment is a bit darker than the edges of the paper... the reason for this is because I first inked my stamp with a black ink before inking it with my Pumpkin Spice ink! I found that this just helps the words to pop out a bit more & not blend into the paper.


Thanks again for stopping by!!


Till next time... Happy Scrapping!! :-)


Monday, February 20, 2012

Nanoose Bay


It's not until you sit down & write about the layouts that you create & the products that you, that realize you have a tendency to use the same company over & over again! This layout again features Fancy Pants... this time their "rusted sun" collection. The layout was inspired from a sketch I found on the "Sketch Support" website.

As you can see I decided to type out my story on the computer & then print it on patterned paper. I liked doing the journaling this way as I was able to fit more of the story onto the page!

Oh another thing I wanted to mention was the scalloped sticker that runs across the bottom of the striped paper... This is, like I mentioned a sticker... one of those  12" stickers that you find on those sticker pages. When you cut them & line them up against a picture or another piece of paper, it looks like it is a lot longer than the 12"! This is a great way to trick the eye into thinking it is longer!

Thanks again for stopping by!!

Till next time... Happy Scrapping!! :-)


Sunday, February 19, 2012

whale of a time

Welcome back!!

Todays layout features the "Beach Bum" collection by Fancy Pants!


You will notice a couple of things...

  1. I used some "bling" on this layout!! Normally I use the crystals/gems that I can just put where ever I like - no pattern or shape but these swirls reminded me of waves! So this was the 1st time I tried using ones where the crystals are in a particular shape & let me tell you, I needed patients! But once I got the hang of it, it wasn't that bad. 
  2. I used cardstock as part of my background instead of just patterned paper. Because of the dull light brown/tan background (the colour of sand) & the faded patterned paper, I decided on brightening up the page by using orange cardstock. I was able to get away with using this colour because there are bits of orange through out the design on the patterned paper.
  3. I also traced the letters of my title. I have done this a couple of times, especially when part of the title seems to blend into the rest of the page.
  4. I've also used blue rick rack ribbon, that runs across the bottom of both pages, to simulate the waves of the water!
Hopefully it wasn't just the pictures that made you feel like this was a water themed layout!! What will you do on your next layout to add that ever so subtle message about your page??

Till next time... Happy Scrapping!! :-)


Friday, January 27, 2012

Wilson


This layout is a very simple one, with lots of "white space"... meaning that not every inch of it has something going on. I usually like to get as much into a layout as possible, but when I went to do this one, I only had the 1 picture of Wilson that was taken this day... so what do I do?

When looking through magazines or checking out different websites/blogs, I see quite a few layouts with only one pic, so this was my first attempt...

I'm going to share a little secret with you.... I like to save money... who doesn't these days! But did you know you could do it & still scrapbook!!??!! Honest!

One of the ways I have found to save $$ when scrapbooking is that when I plan on covering most of the cardstock with patterned paper, I cut out the centre of the page! That's right, the cardstock edge on this layout is only 2 inches wide! There is a big 8 inch square cut out of the back!! This is what I used to mat the picture on this layout as well as the larger pic on the last layout - Is it Bath Time?!! (FYI, I did the same thing on that layout as well!!)

Give it a try some time!! :-) And for those of you that are wondering... Yes, I have done this with double page layouts as well!!! :-) Let me know if you try it & how it worked out for you!!

Thanks once again for stopping by!!

Till next time... Happy Scrapping!! :-)

FYI - I completed this layout in under 2 hours... meaning that I beat my record, for creating a 1 page layout, by an hour!! Oh & the paper I used for this layout is also from the "Happy Together" collection by Fancy Pants!

Monday, January 2, 2012

4 of 4... Silly, Chilly, Days

This was the last of the 4 layouts that I worked on & it's also the one I spent the most time on, as I wanted it to be different than all the rest!! I just wasn't sure how I was going to do that. For this layout, I took the 1st layout & flipped it upside down! Hope you like the way it turned out!!

And incase you hadn't already guessed, I used the Echo Park's new "Winter Park" Collection again!! :-)


As you have seen with all these pages, I don't have my Christmas / Winter pics yet... so when I make layouts without pics, I have a set of white paper cutouts in different sizes that I use to plan the layout! So as I was playing around with the group of 4 "pics" on the right hand page, trying to decide on the sizes, I happen to leave a space in the middle... I though that it was a nice change from the 4 square pics that I was originally trying to figure out. This space allowed me to add a pop-dot or some sort of embellishment! (I don't plan on sticking with the snowflake that is currently there, I won't decide on what I'll add until I add my pics... I just didn't want to leave it bare!)

Also because I wanted the bottom of the pics to all line up, I had to be "creative" with my picture sizes, hence the 2 7/8 x 5 or the 2 3/8 x 5!!

When I remove the fake "pics", I write the measurements down (as seen below), so that when I'm ready to add the pics, I can cut them to the correct size! It will save a ton of time when I get my pics!! :-)


You will also notice that instead of the title "Snow" that is on the bingo card, I used the words found on the ribbon that runs across the bottom of the page - Silly, Chilly, Days!!

Oh 1 last thing... when I add the bottom right hand pic, I will round the corner... so 3 of the 4 corners will be rounded... I didn't want to round the "Snow" bingo card.

Thanks for following this set of 4 layouts! Hope you enjoyed it!!

Till next time... Happy Scrapping!! :-)

PS : If you missed page # 1, click here... page # 2, click here or page # 3, click here!

Saturday, November 19, 2011

It's Christmas... Countdown Calendar

A number of years ago, I picked up a "Karen Foster's" countdown calendar but had never done anything with it... that is until today...

Last weekend I was looking through the November/December 2011 edition of Creating Keepsakes Magazine & came across an add featuring this product. It inspired me to pull the unopened package out of my closet & start looking for paper to use in order to complete this project. I couldn't find any paper in my stash, so I went to Michael's... that's when I came across K&Company's  "Elizabeth Brownd Visions of Christmas 12x12 Designer Paper Pad" & knew that this is what I was looking for...


If you clicked on the link above, you can see that there are half circles on the front of each of these 25 little boxes in order to make it easier to pull out the tiny box & see what is inside. As I didn't want to take away from the picture, I decided not to cut out these notches but had to come up with some other way to remove the boxes so I decided instead to add knobs that would be strong enough to pull on but wouldn't tear the paper... That's when I decided to use brads as little knobs!!

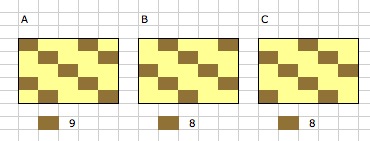
I didn't have enough of 1 colour, so I had to come up with some sort of pattern in order to use 2 different colours... I started by placing 2 gold brads on the boxes followed by 1 brown one & continued this pattern.

For those of you that really know me... you know that I'm a bit of a perfectionist... I like things to be just right... so I just had to come up with an "eye pleasing" arrangement for the placing of these brads, so I did what I often do... I opened up Excel & start playing!! :-)

As mentioned above, my first attempt was "C" below, but as you can see, it just doesn't look right... "B" is the opposite of "C" but "A" is just right & that is the pattern I went with!! :-)


So once I had my design, I just had to figure out how I was going to attach them.

I first attached the paper to the box & then punctured a hole in each of them, putting the brad through the paper & the cardboard. If I closed the brad tight against the box, it was hard to get a handle on the knob in order to pull the box out of it's drawer, so I had to leave enough room to get my nail under it & pull it out!

Now I can put a "little" something into each of these boxes & know that we will be able to open them up on the appropriate date!!

Oh that reminds me... as you can see I didn't put a number on the box... label them 1 through 25... again I decided against this because I didn't want to take away from the picture...

Thanks for reading this looonngg post!! Hope it inspired you to try something new...

Till next time... Happy Scrapping!! :-)